Hooked on Anime (![[personal profile]](https://www.dreamwidth.org/img/silk/identity/user.png) hooked_on_anime) wrote2010-07-24 10:14 pm
hooked_on_anime) wrote2010-07-24 10:14 pm
Entry tags:
Smudge the Fire Spider
By request, the pattern for Smudge the Fire Spider from Jim C. Hines' Jig the Goblin series, in three parts. This is only my second attempt at making a pattern by working backwards, and while I feel better about it than my previous one, please feel free to let me know if you think it is lacking in any way.
This post contains many images, so it is probably not safe for dial-up.
Part One: Basic Spider Pattern
If you aren't familiar with crochet, I would like to start by recommending the basic amigurumi tutorial at Hooks and Needles: Part One, Part Two, Part Three
The things you need to know to make this spider are: Crocheting in the round (in a spiral), Chain Stitch (ch), Single Crochet (sc) (all in first tutorial); Slip Stitch (third tutorial); Increasing (stitch 2 in 1), Decreasing (stitch 2 together or skip one stitch); Front Post Stitch (first half of video) (OPTIONAL; see notes after second body segment).
The tutorials use US stitch names.
Be sure to leave long tails of yarn for these; I've found them helpful in sewing body segments together.
Rear end of spider:
Row 1: Begin in a ring; 6 single crochet (sc)
Row 2: 12 sc (stitch 2 in each stitch)
Row 3: 18 sc (stitch 1, stitch 2 in 1)
Row 4: 24 sc (stitch 2, stitch 2 in 1)
Row 5: 30 sc (stitch 3, stitch 2 in 1)
Rows 6 thru 10: sc 1 in each stitch
Row 11: 24 sc (stitch 3, stitch 2 together/skip 1 stitch)
Row 12: 18 sc (stitch 2, stitch 2 together/skip 1 stitch)
Row 13: 12 sc (stitch 1, stitch 2 together/skip 1 stitch)
Row 14: 6 sc (stitch 2 together each stitch/skip every other stitch)
Row 15: 3 sc (skip every other stitch); finish/tie off, cut
Front end of spider:
Row 1: Begin in a ring; 6 single crochet (sc)
Row 2: 12 sc (stitch 2 in each stitch)
Row 3: 18 sc (stitch 1, stitch 2 in 1)
Row 4: 24 sc (stitch 2, stitch 2 in 1)
Row 5 thru 8: sc 1 in each stitch
Row 9: 18 sc (stitch 2, stitch 2 together/skip 1 stitch)
Row 10: 12 sc (stitch 1, stitch 2 together/skip 1 stitch)
Row 11: 6 sc (stitch 2 together each stitch/skip every other stitch)
Row 12: 3 sc (skip every other stitch); finish; only cut if you are not going to use the front post crochet method on the legs
At any point now, you may stitch the front and back body parts together, and add eyes. I like to stitch the body segments together sooner rather than later, so I have a direction to orient the legs. I also like to use yarn to embroider in eyes, mouths, what-have-you, but you don't have to; there are pre-made eyes for use in plush dolls available in most craft stores, and you can use felt for mouths or contrasting colored areas (particularly large eyes, pale bellies, inside of ears, etc).
With regards to front post crochet and the legs: I like to cut as rarely as possible, so I figured out front post crochet as I went along. I didn't even know there was a name for it when I first did it. If you feel more comfortable not using front post crochet, I'm ad-libbing another method you could use.
Legs:
IF YOU ARE USING FRONT POST CROCHET:
* Front post (fp) one slip stitch (sl st) to the rear/outside of the spider's head; the following should take you in a rough horse-shoe/upside-down "U" shape
* Chain (ch) 15; sl st 14; fp 1 sl st to the front; repeat three times. (This should give you four legs on one side.)
* Fp 2 sl st; ch 4; sc 1, sl st 2; fp 1 sl st; ch 4; sc 1, sl st 2. This should make two fangs/pedipalps (warning for realistic scorpion drawing, spider photos in link)
* Fp 2 sl st; ch 15; sl st 14; fp 1 sl st to the front; repeat three times. This will give you the four legs on the other side of the spider.
* If you haven't already, make sure both body segments are stitched together, and add your eyes.
* You're done!
IF YOU ARE NOT USING FRONT POST CROCHET:
* PLEASE NOTE: I haven't tested this method out myself yet! I made it up on the fly here (heh; fly, spider...). I have no idea whether it works or not. Please let me know/otherwise yell at me if it does not work, and I will try and find a way that does (and that doesn't use front post crochet).
* Chain (ch) 13
* Start second row: ch 15; slip stitch (sl st) 14 back
* (Ch 15; slip stitch (sl st) 14 back) three more times
* Sl st 1
* Ch 4; sc 1, sl st 2; repeat in next stitch
* Sl st 1
* (Ch 15; slip stitch (sl st) 14 back) four times; finish and cut yarn
* Stitch legs and fangs/pedipalps (warning for realistic scorpion drawing, spider photos in link) to underside of front body segment in horseshoe/upside-down "U" shape, so the fangs/pedipalps are at the front and the legs on either side.
* If you haven't already, make sure both body segments are stitched together, and add your eyes.
* You're done!
You've just finished your spider base :) It should look roughly like so:


Part Two: Adding Fluff
This is the first half of making your flames. I've separated it from the second half, because it can also be used for adding general large-body fuzz to things (see Burupya: Front, Side).
1) Start with the object you're going to fuzzify/enflame; cut a good number of pieces of yarn at more than twice as long as you'll want your fuzz/fire to be, in the color you want the top of your flame to be (or the color you want your fuzz to be, depending). For Smudge, I used pieces about two-to-three inches/five-to-seven centimeters long.

2) Start attaching the pieces of yarn to the area you wish to fuzzify/enflame. I usually double the length of yarn over, pull the loop end under a stitch/post, and then pull the end ends through the loop, as shown below.


3) When you have completely yarned the area you wish to be covered in fuzz or fire, get a brush and start teasing/fraying the ends of the yarn out. I use a brush designed to groom cats, but that's mostly because it's usually on the table where I work. A regular thickly bristled brush or fine-toothed comb for human hair should do the trick. With longer yarn pieces and/or less tricky brushing spots, I find it easier to brush out small sections of yarn at a time.


Your end product should look something like this:

4) Cut the fuzz into the appropriate length/style. For Smudge, I shortened the fuzz on the front half of his body, and on both halves I snipped it a little more ragged where I wanted flame "points" to be. If you're just doing fuzz, you may only want to even it out a bit, or there may be some places where the fuzz is longer than others.

If you're just doing fuzz, congratulations! You're finished ;) Or, if you want your fuzz distinctly spikier, you can go on to the first step of the next part. If you're working on flames, hey! You're half way there :Db
Part Three: Setting Fluff on Fire
Here comes the part with wet stuff: glue and paint. Any basic white glue will work for this; I'd recommend acrylic or fabric paint for the paint, though. As far as paint color goes, choose one that you want for the base of your flames.
1) First, pour some white glue on your fingertips. If you've got sensitive skin, or just don't like having glue there, you may want to use gloves for this part! Use the glue to spike the top of the fuzz like styling gel. I like to add a bit of a twist at the end to make the flames a little pointier. Don't worry if you don't end up with very many flame ends/points; you can separate them out a little bit when everything dries, and it'll still look good.


2) When your fuzz is all spiked, it's time to get out the paint! Apply it all around the base of the flames. Don't worry if a little gets on your spider (or whatever you want to add fire to); it should blend in reasonably well. Be sure to use a reasonably thick coat, so it'll still be pretty visible when some gets soaked up by the yarn.

3) All that's really left is waiting for it to dry :) If you want to spread out your flame spikes a little, do that once the drying is done, and it'll look great. Also, you won't get more glue or paint on your hands ;)

And that's all there is! Happy fire-spider making ♥
PS: If anyone wants to make a knitting pattern based on this, or just wants to point to a spider pattern for knitters instead or something, you have my gratitude/blessing/general happiness that I don't have to do it myself (especially since I don't knit ^^a). Thanks!
This post contains many images, so it is probably not safe for dial-up.
Part One: Basic Spider Pattern
If you aren't familiar with crochet, I would like to start by recommending the basic amigurumi tutorial at Hooks and Needles: Part One, Part Two, Part Three
The things you need to know to make this spider are: Crocheting in the round (in a spiral), Chain Stitch (ch), Single Crochet (sc) (all in first tutorial); Slip Stitch (third tutorial); Increasing (stitch 2 in 1), Decreasing (stitch 2 together or skip one stitch); Front Post Stitch (first half of video) (OPTIONAL; see notes after second body segment).
The tutorials use US stitch names.
Be sure to leave long tails of yarn for these; I've found them helpful in sewing body segments together.
Rear end of spider:
Row 1: Begin in a ring; 6 single crochet (sc)
Row 2: 12 sc (stitch 2 in each stitch)
Row 3: 18 sc (stitch 1, stitch 2 in 1)
Row 4: 24 sc (stitch 2, stitch 2 in 1)
Row 5: 30 sc (stitch 3, stitch 2 in 1)
Rows 6 thru 10: sc 1 in each stitch
Row 11: 24 sc (stitch 3, stitch 2 together/skip 1 stitch)
Row 12: 18 sc (stitch 2, stitch 2 together/skip 1 stitch)
Row 13: 12 sc (stitch 1, stitch 2 together/skip 1 stitch)
Row 14: 6 sc (stitch 2 together each stitch/skip every other stitch)
Row 15: 3 sc (skip every other stitch); finish/tie off, cut
Front end of spider:
Row 1: Begin in a ring; 6 single crochet (sc)
Row 2: 12 sc (stitch 2 in each stitch)
Row 3: 18 sc (stitch 1, stitch 2 in 1)
Row 4: 24 sc (stitch 2, stitch 2 in 1)
Row 5 thru 8: sc 1 in each stitch
Row 9: 18 sc (stitch 2, stitch 2 together/skip 1 stitch)
Row 10: 12 sc (stitch 1, stitch 2 together/skip 1 stitch)
Row 11: 6 sc (stitch 2 together each stitch/skip every other stitch)
Row 12: 3 sc (skip every other stitch); finish; only cut if you are not going to use the front post crochet method on the legs
At any point now, you may stitch the front and back body parts together, and add eyes. I like to stitch the body segments together sooner rather than later, so I have a direction to orient the legs. I also like to use yarn to embroider in eyes, mouths, what-have-you, but you don't have to; there are pre-made eyes for use in plush dolls available in most craft stores, and you can use felt for mouths or contrasting colored areas (particularly large eyes, pale bellies, inside of ears, etc).
With regards to front post crochet and the legs: I like to cut as rarely as possible, so I figured out front post crochet as I went along. I didn't even know there was a name for it when I first did it. If you feel more comfortable not using front post crochet, I'm ad-libbing another method you could use.
Legs:
IF YOU ARE USING FRONT POST CROCHET:
* Front post (fp) one slip stitch (sl st) to the rear/outside of the spider's head; the following should take you in a rough horse-shoe/upside-down "U" shape
* Chain (ch) 15; sl st 14; fp 1 sl st to the front; repeat three times. (This should give you four legs on one side.)
* Fp 2 sl st; ch 4; sc 1, sl st 2; fp 1 sl st; ch 4; sc 1, sl st 2. This should make two fangs/pedipalps (warning for realistic scorpion drawing, spider photos in link)
* Fp 2 sl st; ch 15; sl st 14; fp 1 sl st to the front; repeat three times. This will give you the four legs on the other side of the spider.
* If you haven't already, make sure both body segments are stitched together, and add your eyes.
* You're done!
IF YOU ARE NOT USING FRONT POST CROCHET:
* PLEASE NOTE: I haven't tested this method out myself yet! I made it up on the fly here (heh; fly, spider...). I have no idea whether it works or not. Please let me know/otherwise yell at me if it does not work, and I will try and find a way that does (and that doesn't use front post crochet).
* Chain (ch) 13
* Start second row: ch 15; slip stitch (sl st) 14 back
* (Ch 15; slip stitch (sl st) 14 back) three more times
* Sl st 1
* Ch 4; sc 1, sl st 2; repeat in next stitch
* Sl st 1
* (Ch 15; slip stitch (sl st) 14 back) four times; finish and cut yarn
* Stitch legs and fangs/pedipalps (warning for realistic scorpion drawing, spider photos in link) to underside of front body segment in horseshoe/upside-down "U" shape, so the fangs/pedipalps are at the front and the legs on either side.
* If you haven't already, make sure both body segments are stitched together, and add your eyes.
* You're done!
You've just finished your spider base :) It should look roughly like so:
Part Two: Adding Fluff
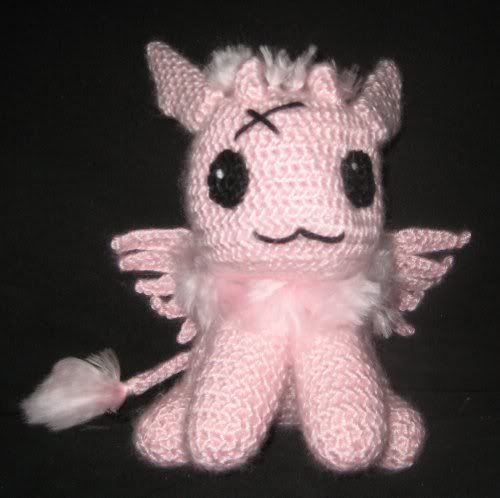
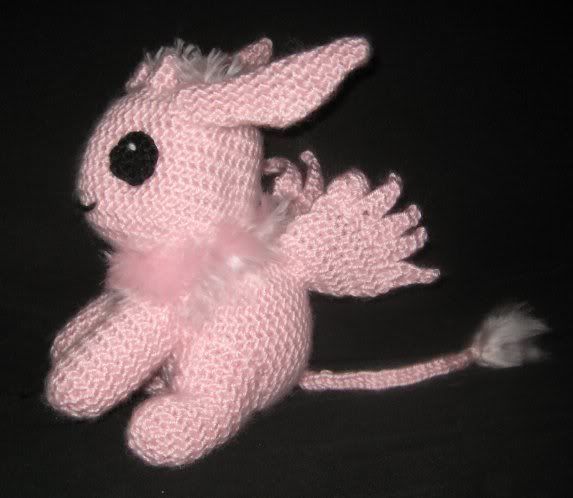
This is the first half of making your flames. I've separated it from the second half, because it can also be used for adding general large-body fuzz to things (see Burupya: Front, Side).
1) Start with the object you're going to fuzzify/enflame; cut a good number of pieces of yarn at more than twice as long as you'll want your fuzz/fire to be, in the color you want the top of your flame to be (or the color you want your fuzz to be, depending). For Smudge, I used pieces about two-to-three inches/five-to-seven centimeters long.
2) Start attaching the pieces of yarn to the area you wish to fuzzify/enflame. I usually double the length of yarn over, pull the loop end under a stitch/post, and then pull the end ends through the loop, as shown below.
3) When you have completely yarned the area you wish to be covered in fuzz or fire, get a brush and start teasing/fraying the ends of the yarn out. I use a brush designed to groom cats, but that's mostly because it's usually on the table where I work. A regular thickly bristled brush or fine-toothed comb for human hair should do the trick. With longer yarn pieces and/or less tricky brushing spots, I find it easier to brush out small sections of yarn at a time.
Your end product should look something like this:
4) Cut the fuzz into the appropriate length/style. For Smudge, I shortened the fuzz on the front half of his body, and on both halves I snipped it a little more ragged where I wanted flame "points" to be. If you're just doing fuzz, you may only want to even it out a bit, or there may be some places where the fuzz is longer than others.
If you're just doing fuzz, congratulations! You're finished ;) Or, if you want your fuzz distinctly spikier, you can go on to the first step of the next part. If you're working on flames, hey! You're half way there :Db
Part Three: Setting Fluff on Fire
Here comes the part with wet stuff: glue and paint. Any basic white glue will work for this; I'd recommend acrylic or fabric paint for the paint, though. As far as paint color goes, choose one that you want for the base of your flames.
1) First, pour some white glue on your fingertips. If you've got sensitive skin, or just don't like having glue there, you may want to use gloves for this part! Use the glue to spike the top of the fuzz like styling gel. I like to add a bit of a twist at the end to make the flames a little pointier. Don't worry if you don't end up with very many flame ends/points; you can separate them out a little bit when everything dries, and it'll still look good.
2) When your fuzz is all spiked, it's time to get out the paint! Apply it all around the base of the flames. Don't worry if a little gets on your spider (or whatever you want to add fire to); it should blend in reasonably well. Be sure to use a reasonably thick coat, so it'll still be pretty visible when some gets soaked up by the yarn.
3) All that's really left is waiting for it to dry :) If you want to spread out your flame spikes a little, do that once the drying is done, and it'll look great. Also, you won't get more glue or paint on your hands ;)
And that's all there is! Happy fire-spider making ♥
PS: If anyone wants to make a knitting pattern based on this, or just wants to point to a spider pattern for knitters instead or something, you have my gratitude/blessing/general happiness that I don't have to do it myself (especially since I don't knit ^^a). Thanks!