Gritty Pattern
Nov. 9th, 2020 12:25 amI'm back! In a limited capacity, at any rate. I had a crochet block for a looooong time there. I finally got over it a couple years ago, but still wasn't up to making any fan patterns to share—up until ![[community profile]](https://www.dreamwidth.org/img/silk/identity/community.png) equalityauction earlier this year, that is, when I was starting to be a lot more financially conscious due to Covid but still desperately wanted to help out. My winning bidder picked Gritty, and I cannot tell you how delighted I am to be able to share the pattern I came up with.
equalityauction earlier this year, that is, when I was starting to be a lot more financially conscious due to Covid but still desperately wanted to help out. My winning bidder picked Gritty, and I cannot tell you how delighted I am to be able to share the pattern I came up with.
But first, we've got the obligatory photos 😉


Okay, yes, I'm pretty proud of how he turned out.
And now, the pattern! As some of you may have already observed, Gritty is in primarily single crochet, rather than my typical double crochet (that'll be double crochet and treble crochet for those of you in the UK). I know that's what a lot of folks prefer, and this pattern in particular I wanted to at least try to make somewhat beginner-friendly. I've got a good few photos to go along with the directions this time as well.
Skills
Crocheting in the round [spiral/unjoined rounds]
Single crochet (sc)
Double crochet (dc)
Slip stitch (sl st)
Back loop crochet (bl [stitch])*
Popcorn stitch**
Increasing ([stitch] 2 in 1)
Decreasing [double crochet] ([stitch] 2 tog)
US stitch terms used
Sizing information: I used a size H/5.0mm hook and worsted weight yarn for a gauge of 4 sc/inch (2.5 cm).
* Back Loop Crochet: In each row of crochet, in the stitch you put your hook through, there are two “loops” of yarn. For front and back loop crochet, you only use one loop: For front loop crochet (not used in this pattern), you use only the loop that is closer to you (in front); for back loop crochet, you use only the loop that is farther away from you (in back).
Note: For this pattern, back loop crochet is mostly used to make color changes look cleaner; using standard slip stitch or single crochet instead will still create stripes fine, they may just look a little bit rougher. The exception is the starting rows of Gritty’s legs, which eventually form the heel of his boots; the back loop crochet there is to make the bottom flat.
** Popcorn Stitch: To make a popcorn stitch, you make the number and type of stitches indicated into a single stitch, like when you’re increasing (in this case, five). When you’ve made the final stitch, you remove your hook from the yarn, put it through the top of the first stitch in the popcorn group, then pull the working loop from the end of the popcorn group through that first stitch. This will make a little cluster of stitches that stick out from the rest of the work, like a ball. In the next round or row of stitches, treat the first stitch in the popcorn cluster as the only stitch. For this pattern, I used them for Gritty’s fingers and thumbs. When crocheting the next round of the pattern, go through only the loop that you used to cluster the popcorn stitches together (the one you pulled from the last stitch through the first stitch).
Materials: Orange yarn the color of Gritty’s fur, Flyers orange yarn, black yarn, white yarn; scissors; stuffing/polyfil; tapestry needle; slicker brush/carding comb (optional); roving the color of Gritty's fur (optional); toy squeaker (optional)
Head
Round 1: Use Gritty colored yarn. Begin in a ring; sc 6; continue in a spiral
Round 2: Sc 12 ([sc 2 in 1] x 6)
Round 3: Sc 18 ([sc 2 in 1, sc 1] x 6)
Round 4: Sc 24 ([sc 2 in 1, sc 2] x 6)
Round 5: Sc 27 ([sc 2 in 1, sc 5] x 3)
Round 6: Sc 30 ([sc 2 in 1, sc 6] x 3)
Round 7 thru 11: Sc 30
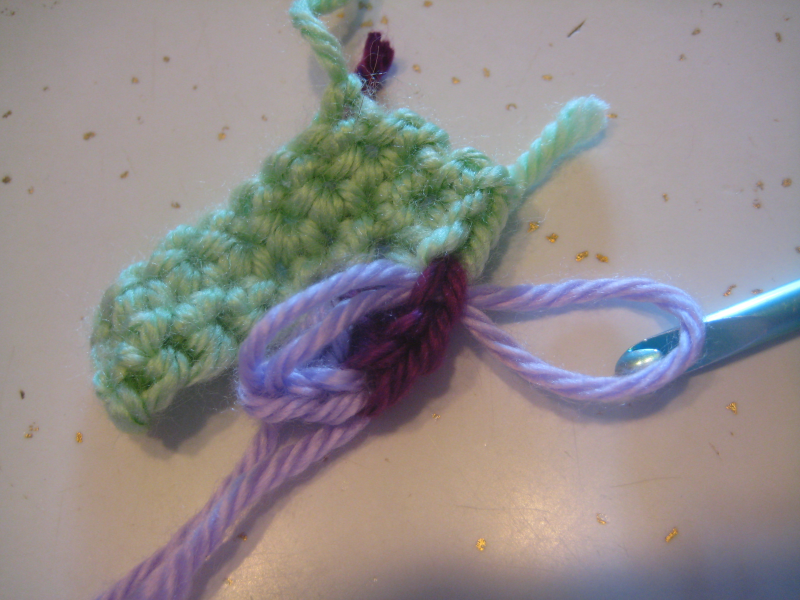
Round 12: Free ch 10, skip first 10 stitches of Round 11, sc 20 into remaining stitches; this will create a loop of chain stitches and a hole between Round 11 and the remaining rounds, making the opening for Gritty’s iconic gaping maw. (See photo.)
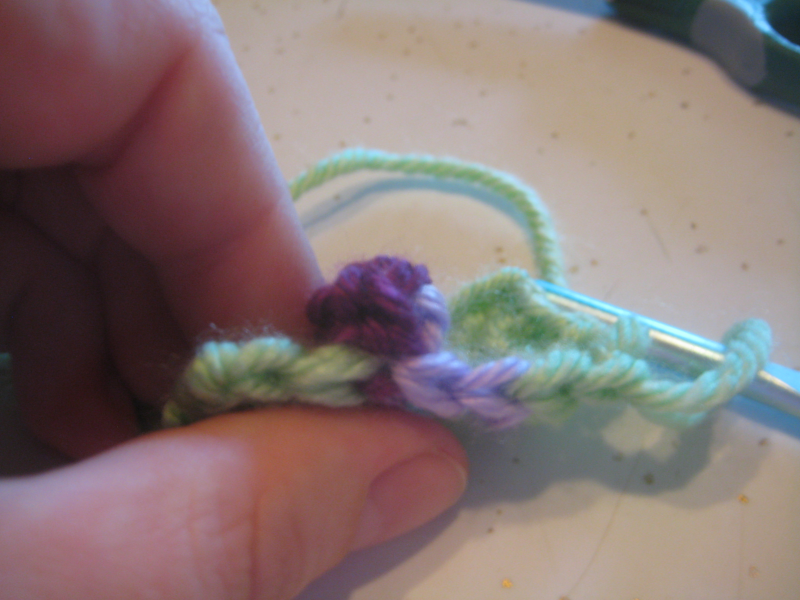
Round 13: Sc 30 (sc into each chain stitch, then each sc) (Photo.)
Round 14: Sc 24 ([sc 2 tog, sc 2] x 6)
Round 15: Sc 18 ([sc 2 tog, sc 1] x 6)
Round 16: Sc 12 (sc 2 tog x 6)
Round 17: Sc 6 (sc 2 tog x 6)
Round 18: Sl st every other stitch to close (sl st 3); cut the tail of the yarn long.
Fin
(Finished head photo.)
Mouth
Round 1: Use black yarn. Begin in a ring; sc 6; continue in a spiral
Round 2: Sc 12 ([sc 2 in 1] x 6)
Round 3: Sc 18 ([sc 2 in 1, sc 1] x 6)
Round 4: Sc 24 ([sc 2 in 1, sc 2] x 6)
Fin
Arms (make 2)
Round 1: Use Flyers orange yarn. Begin in a ring; sc 6; continue in a spiral
Round 2: Sc 12 ([sc 2 in 1] x 6)
Round 3 thru 13: Sc 12
Round 14: Sc 11, slst 1
Round 15: Switch to white yarn; bs slst 1, blsc 11
Round 16: Sc 12
Round 17: Slst 1, switch to black yarn; bl slstl 1, bl sc 10;
Round 18: Bl sc 2, sc 10
Round 19: Sc 2, slst 1
Fin
Arm Stripes (make 2, one for each arm)
Row 1: Use white yarn. Ch 12
Row 2: Sc 11
Fin
Torso
Round 1: Start with Gritty color yarn. Begin in a ring; sc 6; continue in a spiral
Round 2: Sc 12 ([sc 2 in 1] x 6)
Round 3: Switch to white yarn. [Bl sc 3, bl sc 2 in 1 x 3] x 2 (18 stitches)
Round 4: [Sc 3, (sc 2 in 1, sc 1) x 3] x 2 (24 stitches)
Round 5: Switch to Flyers orange yarn and stitch this entire round in the back loop; sc 3, (sc 1, sc 2 in 1, sc 1) x 3, sc 3, (sc 1, sc 2 in 1, sc 1) x 3 (30 stitches)
Round 6: Sc 30
Round 7: Sc 9, sc 2 in 1, sc 14, sc 2 in 1, sc 5 (32 stitches)
Round 8: Sc 32
Round 9: Sc 10, sc 2 in 1, sc 15, sc 2 in 1, sc 5 (34 stitches)
Round 10: Sc 34
Round 11: Sc 11, sc 2 in 1, sc 16, sc 2 in 1, sc 5 (36 stitches)
Round 12: Sc 36
Round 13: Sc 12, sc 2 in 1, sc 17, sc 2 in 1, sc 5 (38 stitches)
Round 14: Sc 38
Round 15: Sc 13, sc 2 in 1, sc 18, sc 2 in 1, sc 5 (40 stitches)
Round 16: Sc 39, sl st 1
Round 17: Switch to white yarn; sl st 1, bl sc 39 (40 stitches)
Round 18: Sc 40
Round 19: Sl st 1, switch to Flyers orange yarn, sl st 1, bl sc 38 (40 stitches)
Round 20: Sc 39, sl st 1; cut a long tail to finish
Fin
Logo
Round 1: Start with Flyers orange yarn. Begin in a ring; sc 6; continue in a spiral
Round 2: Switch to black yarn; bl sc 12 ([sc 2 in 1] x 6)
Row 3: Sl st 1, ch 6, sl st 5 (rows create the “feathers”)
Row 4: Ch 5, sl st 4 into chain stitches, sl st 1 into main work
Row 5: Ch 4, sl st 3into chain stitches, sl st 1 into main work
Row 6: Sl st 1, ch 3, sl st 2; sl st 1 into main work; cut tail long
Fin
Pants
Row 1: Use black yarn. Ch 36
Round 2: Sl st into first ch of Round 1 to form a circle; sc in remaining ch stitches (sc 35)
Round 3 thru 9: Sc 36
Round 10a: Sc 18
Round 11a: Continue through the first sc of Round 10a, forming a smaller tube; sc 18
Round 12a thru 14a: Sc 18
Round 15a: Sc 17, sl st 1; cut tail long
First pants leg finished; return to Round 9
Round 10b: Sc into stitch 19 of Round 9, where Round 10a ends
Round 11b: Continue through the first sc of Round 10b, forming the second pants leg; sc 18
Round 12b thru 14b: Sc 18
Round 15b: Sc 17, sl st 1; cut tail long
Fin
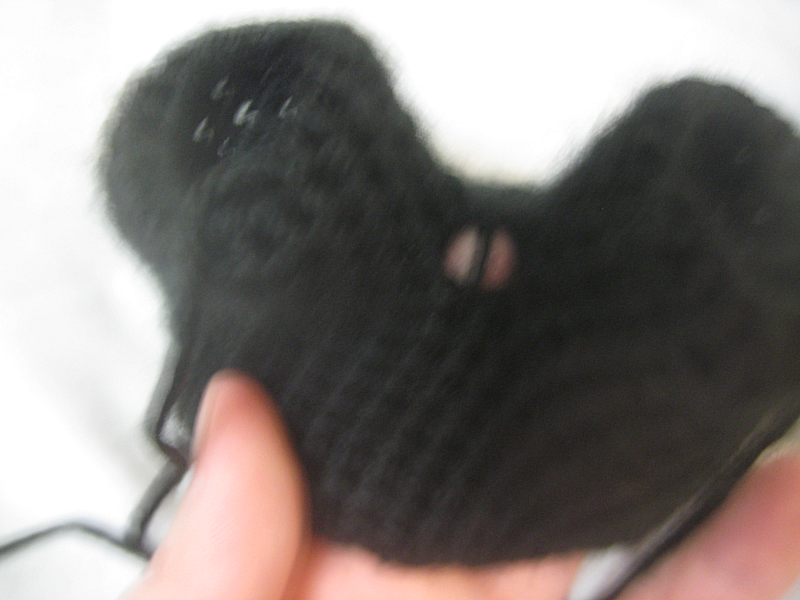
(Note: There will be a tiny gap between Gritty’s legs right where they split [see photo]; I recommend sewing this together, since you’ll be stuffing the legs, but it’s a small enough hole and in such a weird place that it also shouldn’t be much of a problem if you ignore it.)
Legs (make 2)
Round 1: Start with black yarn. Begin in a ring; sc 6; continue in a spiral
Round 2: Sc 12 ([sc 2 in 1] x 6)
Round 3: Bl sc 11, sc 1
Round 4 thru 8: Sc 12
Round 9: Sc 11, sl st 1
Round 10: Switch to Gritty orange yarn; bl sc 12
Round 11 thru 16: Sc 12
Round 17: Sc 11, sl st 1; tail does not need to be long
Fin
Toes (make 2)
Round 1: Start with black yarn. Begin in a ring; sc 6; continue in a spiral
Round 2: Sc 12 ([sc 2 in 1] x 6)
Round 3, 4: Sc 12
Round 5: Sc 11, sl st 1; cut tail long
Fin
Hands
Row 1: Use Gritty color yarn. Ch 9
Round 2: Sl st into first chain from Row 1; sc 9
Round 3 thru 5: Sc 9
Round 6: Popcorn dc 5, sc 8
Round 7: Sc 2 tog, sc 7 (sc 8 total)
Round 8: Fold Gritty’s hand flat with the thumb sticking out one side. Pop 5 dc, then sl st in sc 7 from Round 7; Pop 5 dc, sl st in sc 6; pop 5 dc, sl st in sc 5; sl st in sc 4 to finish.
Fin
Helmet
Round 1: Start with black yarn. Begin in a ring; sc 6; continue in a spiral
Round 2: Sc 12 ([sc 2 in 1] x 6)
Round 3: Sc 18 ([sc 2 in 1, sc 1] x 6)
Round 4: Sc 24 ([sc 2 in 1, sc 2] x 6)
Round 5, 6: Sc 24
Round 7: Sc 23, sl st 1; cut tail long
Fin
Assembly
Sew the arm stripes to one side of the arms so one end of the stripes is touching the first round and the other is touching the round where you switched colors to white.
Stuff a small amount of stuffing into the arms one at a time, so it’s evenly spread out but not too puffy; leave the last two or three rounds to the opening empty. Stuff a similar amount into the hands. Push the starting rounds of the hands into the openings of the sleeves; make sure the stripe is on the top side of the arm, with the thumb pointing either right or left. Using the long tail of black yarn, sew Gritty’s hand into his sleeve, so the sleeve goes down just over his wrist.
Flatten Gritty’s torso with the increase stitches on the edges; this should make the torso form sort of a trapezoid. Sew Gritty’s arms on to either side of the trapezoid, so the ends of the white stripes on his arms meet the white stripe around the collar of his uniform.
You should be able to tell now which side of the torso is the front and which side is the back. Find the middle of the front and, using the leading end of the yarn, tie the logo in place in roughly that spot. Sew the outside edges down using either black or white yarn; if you’re using white yarn, you may need to use extra stitches to outline the logo thoroughly.
On the back of Gritty’s jersey, you can add his team number, the double zero. I used a doubled length of white yarn and made each zero two stitches wide and five rows tall, with a space of two stitches between them.
Take the black circle that’s the inside of Gritty’s mouth; position it so the ridged side is inside his head, and sew one side to the inside (back) loops of the top half of Gritty’s gaping maw. Stuff the top of his head and a little bit behind the mouth. Tie the end of the lead yarn to the bottom of the inside of Gritty’s head; a good way to do this would be to pull that lead yarn through the final stitches of Gritty’s head and tie it onto the orange tail. Once you have stuffed Gritty’s head to your satisfaction, sew the black circle the rest of the way around his mouth. The bottom edge will look a little rougher than the top, since it only has one loop to go through, but that’s okay; that’s where Gritty’s beard is going anyway.
Pin Gritty’s helmet in place on top of his head, making sure it’s squished a little bit to make it a proper oval shape instead of a hemisphere. Sew it down, stuffing before you close it.
Attach Gritty’s hair. I did three layers just below his helmet and half-way around his head, then sideburns down to his chin, which I covered with a beard. I put his eyebrows on about two stitches apart form each other and with two stitches between them and his sideburns. You can either use roving in roughly the same color as the Gritty yarn, or you can cut strips of your Gritty color yarn, latch-hook them in place, and brush them out with a slicker brush/carding comb to make them nice and fluffy. Optional: If you have a slicker brush/carding comb, you can also run it over all of the Gritty-colored yarn to make it slightly fuzzier.
Sew the bottom of Gritty’s head to the Gritty-colored yarn at the top of his torso.
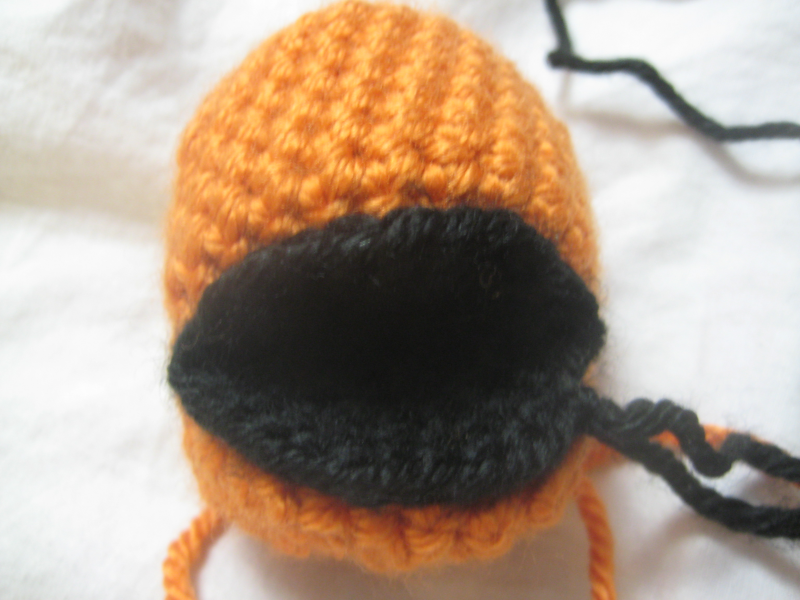
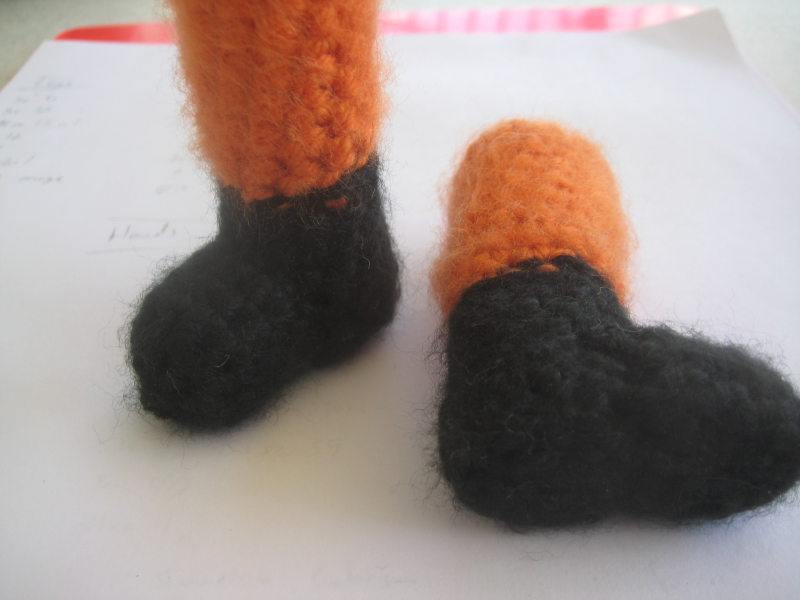
Stuff Gritty’s legs firmly. Stuff the toe pieces, then sew them to the sides of the legs so one edge of the open side of the toe pieces lines up with the back loop crochet at the bottom of Gritty’s legs. See photo.
Stuff Gritty’s torso firmly and fairly full, leaving some room at the bottom few rows. If you have a toy squeaker, put it in with the torso stuffing. Put the pants under the bottom few rows of Gritty’s jersey, then sew them in place with the long tail of yarn from the end of the jersey. There should be one leg on either side, pointing down. Stuff Gritty most of the rest of the way, with only two or three rounds at the cuffs of his pants left unstuffed.
Put Gritty’s legs in his pants, allowing the pants to overlap his legs by two or three rounds. Make sure the toes are pointing forward/are on the same side as the Flyers logo, then sew his legs in place one at a time, making sure the pants still overlap the legs by just a bit.
Make eyes out of felt and paint the pupils on, embroider them, or buy plastic eyes, then either sew or hot glue in place, as you prefer.
If you like this pattern and are comfortably able to do so, please consider donating to the Philly Bail Fund and/or to the Attic Youth Center! They're both fantastic organizations located right in Gritty's hometown.
But first, we've got the obligatory photos 😉
Okay, yes, I'm pretty proud of how he turned out.
And now, the pattern! As some of you may have already observed, Gritty is in primarily single crochet, rather than my typical double crochet (that'll be double crochet and treble crochet for those of you in the UK). I know that's what a lot of folks prefer, and this pattern in particular I wanted to at least try to make somewhat beginner-friendly. I've got a good few photos to go along with the directions this time as well.
Skills
Crocheting in the round [spiral/unjoined rounds]
Single crochet (sc)
Double crochet (dc)
Slip stitch (sl st)
Back loop crochet (bl [stitch])*
Popcorn stitch**
Increasing ([stitch] 2 in 1)
Decreasing [double crochet] ([stitch] 2 tog)
US stitch terms used
Sizing information: I used a size H/5.0mm hook and worsted weight yarn for a gauge of 4 sc/inch (2.5 cm).
* Back Loop Crochet: In each row of crochet, in the stitch you put your hook through, there are two “loops” of yarn. For front and back loop crochet, you only use one loop: For front loop crochet (not used in this pattern), you use only the loop that is closer to you (in front); for back loop crochet, you use only the loop that is farther away from you (in back).
Note: For this pattern, back loop crochet is mostly used to make color changes look cleaner; using standard slip stitch or single crochet instead will still create stripes fine, they may just look a little bit rougher. The exception is the starting rows of Gritty’s legs, which eventually form the heel of his boots; the back loop crochet there is to make the bottom flat.
** Popcorn Stitch: To make a popcorn stitch, you make the number and type of stitches indicated into a single stitch, like when you’re increasing (in this case, five). When you’ve made the final stitch, you remove your hook from the yarn, put it through the top of the first stitch in the popcorn group, then pull the working loop from the end of the popcorn group through that first stitch. This will make a little cluster of stitches that stick out from the rest of the work, like a ball. In the next round or row of stitches, treat the first stitch in the popcorn cluster as the only stitch. For this pattern, I used them for Gritty’s fingers and thumbs. When crocheting the next round of the pattern, go through only the loop that you used to cluster the popcorn stitches together (the one you pulled from the last stitch through the first stitch).
Materials: Orange yarn the color of Gritty’s fur, Flyers orange yarn, black yarn, white yarn; scissors; stuffing/polyfil; tapestry needle; slicker brush/carding comb (optional); roving the color of Gritty's fur (optional); toy squeaker (optional)
Head
Round 1: Use Gritty colored yarn. Begin in a ring; sc 6; continue in a spiral
Round 2: Sc 12 ([sc 2 in 1] x 6)
Round 3: Sc 18 ([sc 2 in 1, sc 1] x 6)
Round 4: Sc 24 ([sc 2 in 1, sc 2] x 6)
Round 5: Sc 27 ([sc 2 in 1, sc 5] x 3)
Round 6: Sc 30 ([sc 2 in 1, sc 6] x 3)
Round 7 thru 11: Sc 30
Round 12: Free ch 10, skip first 10 stitches of Round 11, sc 20 into remaining stitches; this will create a loop of chain stitches and a hole between Round 11 and the remaining rounds, making the opening for Gritty’s iconic gaping maw. (See photo.)
Round 13: Sc 30 (sc into each chain stitch, then each sc) (Photo.)
Round 14: Sc 24 ([sc 2 tog, sc 2] x 6)
Round 15: Sc 18 ([sc 2 tog, sc 1] x 6)
Round 16: Sc 12 (sc 2 tog x 6)
Round 17: Sc 6 (sc 2 tog x 6)
Round 18: Sl st every other stitch to close (sl st 3); cut the tail of the yarn long.
Fin
(Finished head photo.)
Mouth
Round 1: Use black yarn. Begin in a ring; sc 6; continue in a spiral
Round 2: Sc 12 ([sc 2 in 1] x 6)
Round 3: Sc 18 ([sc 2 in 1, sc 1] x 6)
Round 4: Sc 24 ([sc 2 in 1, sc 2] x 6)
Fin
Arms (make 2)
Round 1: Use Flyers orange yarn. Begin in a ring; sc 6; continue in a spiral
Round 2: Sc 12 ([sc 2 in 1] x 6)
Round 3 thru 13: Sc 12
Round 14: Sc 11, slst 1
Round 15: Switch to white yarn; bs slst 1, blsc 11
Round 16: Sc 12
Round 17: Slst 1, switch to black yarn; bl slstl 1, bl sc 10;
Round 18: Bl sc 2, sc 10
Round 19: Sc 2, slst 1
Fin
Arm Stripes (make 2, one for each arm)
Row 1: Use white yarn. Ch 12
Row 2: Sc 11
Fin
Torso
Round 1: Start with Gritty color yarn. Begin in a ring; sc 6; continue in a spiral
Round 2: Sc 12 ([sc 2 in 1] x 6)
Round 3: Switch to white yarn. [Bl sc 3, bl sc 2 in 1 x 3] x 2 (18 stitches)
Round 4: [Sc 3, (sc 2 in 1, sc 1) x 3] x 2 (24 stitches)
Round 5: Switch to Flyers orange yarn and stitch this entire round in the back loop; sc 3, (sc 1, sc 2 in 1, sc 1) x 3, sc 3, (sc 1, sc 2 in 1, sc 1) x 3 (30 stitches)
Round 6: Sc 30
Round 7: Sc 9, sc 2 in 1, sc 14, sc 2 in 1, sc 5 (32 stitches)
Round 8: Sc 32
Round 9: Sc 10, sc 2 in 1, sc 15, sc 2 in 1, sc 5 (34 stitches)
Round 10: Sc 34
Round 11: Sc 11, sc 2 in 1, sc 16, sc 2 in 1, sc 5 (36 stitches)
Round 12: Sc 36
Round 13: Sc 12, sc 2 in 1, sc 17, sc 2 in 1, sc 5 (38 stitches)
Round 14: Sc 38
Round 15: Sc 13, sc 2 in 1, sc 18, sc 2 in 1, sc 5 (40 stitches)
Round 16: Sc 39, sl st 1
Round 17: Switch to white yarn; sl st 1, bl sc 39 (40 stitches)
Round 18: Sc 40
Round 19: Sl st 1, switch to Flyers orange yarn, sl st 1, bl sc 38 (40 stitches)
Round 20: Sc 39, sl st 1; cut a long tail to finish
Fin
Logo
Round 1: Start with Flyers orange yarn. Begin in a ring; sc 6; continue in a spiral
Round 2: Switch to black yarn; bl sc 12 ([sc 2 in 1] x 6)
Row 3: Sl st 1, ch 6, sl st 5 (rows create the “feathers”)
Row 4: Ch 5, sl st 4 into chain stitches, sl st 1 into main work
Row 5: Ch 4, sl st 3into chain stitches, sl st 1 into main work
Row 6: Sl st 1, ch 3, sl st 2; sl st 1 into main work; cut tail long
Fin
Pants
Row 1: Use black yarn. Ch 36
Round 2: Sl st into first ch of Round 1 to form a circle; sc in remaining ch stitches (sc 35)
Round 3 thru 9: Sc 36
Round 10a: Sc 18
Round 11a: Continue through the first sc of Round 10a, forming a smaller tube; sc 18
Round 12a thru 14a: Sc 18
Round 15a: Sc 17, sl st 1; cut tail long
First pants leg finished; return to Round 9
Round 10b: Sc into stitch 19 of Round 9, where Round 10a ends
Round 11b: Continue through the first sc of Round 10b, forming the second pants leg; sc 18
Round 12b thru 14b: Sc 18
Round 15b: Sc 17, sl st 1; cut tail long
Fin
(Note: There will be a tiny gap between Gritty’s legs right where they split [see photo]; I recommend sewing this together, since you’ll be stuffing the legs, but it’s a small enough hole and in such a weird place that it also shouldn’t be much of a problem if you ignore it.)
Legs (make 2)
Round 1: Start with black yarn. Begin in a ring; sc 6; continue in a spiral
Round 2: Sc 12 ([sc 2 in 1] x 6)
Round 3: Bl sc 11, sc 1
Round 4 thru 8: Sc 12
Round 9: Sc 11, sl st 1
Round 10: Switch to Gritty orange yarn; bl sc 12
Round 11 thru 16: Sc 12
Round 17: Sc 11, sl st 1; tail does not need to be long
Fin
Toes (make 2)
Round 1: Start with black yarn. Begin in a ring; sc 6; continue in a spiral
Round 2: Sc 12 ([sc 2 in 1] x 6)
Round 3, 4: Sc 12
Round 5: Sc 11, sl st 1; cut tail long
Fin
Hands
Row 1: Use Gritty color yarn. Ch 9
Round 2: Sl st into first chain from Row 1; sc 9
Round 3 thru 5: Sc 9
Round 6: Popcorn dc 5, sc 8
Round 7: Sc 2 tog, sc 7 (sc 8 total)
Round 8: Fold Gritty’s hand flat with the thumb sticking out one side. Pop 5 dc, then sl st in sc 7 from Round 7; Pop 5 dc, sl st in sc 6; pop 5 dc, sl st in sc 5; sl st in sc 4 to finish.
Fin
Helmet
Round 1: Start with black yarn. Begin in a ring; sc 6; continue in a spiral
Round 2: Sc 12 ([sc 2 in 1] x 6)
Round 3: Sc 18 ([sc 2 in 1, sc 1] x 6)
Round 4: Sc 24 ([sc 2 in 1, sc 2] x 6)
Round 5, 6: Sc 24
Round 7: Sc 23, sl st 1; cut tail long
Fin
Assembly
Sew the arm stripes to one side of the arms so one end of the stripes is touching the first round and the other is touching the round where you switched colors to white.
Stuff a small amount of stuffing into the arms one at a time, so it’s evenly spread out but not too puffy; leave the last two or three rounds to the opening empty. Stuff a similar amount into the hands. Push the starting rounds of the hands into the openings of the sleeves; make sure the stripe is on the top side of the arm, with the thumb pointing either right or left. Using the long tail of black yarn, sew Gritty’s hand into his sleeve, so the sleeve goes down just over his wrist.
Flatten Gritty’s torso with the increase stitches on the edges; this should make the torso form sort of a trapezoid. Sew Gritty’s arms on to either side of the trapezoid, so the ends of the white stripes on his arms meet the white stripe around the collar of his uniform.
You should be able to tell now which side of the torso is the front and which side is the back. Find the middle of the front and, using the leading end of the yarn, tie the logo in place in roughly that spot. Sew the outside edges down using either black or white yarn; if you’re using white yarn, you may need to use extra stitches to outline the logo thoroughly.
On the back of Gritty’s jersey, you can add his team number, the double zero. I used a doubled length of white yarn and made each zero two stitches wide and five rows tall, with a space of two stitches between them.
Take the black circle that’s the inside of Gritty’s mouth; position it so the ridged side is inside his head, and sew one side to the inside (back) loops of the top half of Gritty’s gaping maw. Stuff the top of his head and a little bit behind the mouth. Tie the end of the lead yarn to the bottom of the inside of Gritty’s head; a good way to do this would be to pull that lead yarn through the final stitches of Gritty’s head and tie it onto the orange tail. Once you have stuffed Gritty’s head to your satisfaction, sew the black circle the rest of the way around his mouth. The bottom edge will look a little rougher than the top, since it only has one loop to go through, but that’s okay; that’s where Gritty’s beard is going anyway.
Pin Gritty’s helmet in place on top of his head, making sure it’s squished a little bit to make it a proper oval shape instead of a hemisphere. Sew it down, stuffing before you close it.
Attach Gritty’s hair. I did three layers just below his helmet and half-way around his head, then sideburns down to his chin, which I covered with a beard. I put his eyebrows on about two stitches apart form each other and with two stitches between them and his sideburns. You can either use roving in roughly the same color as the Gritty yarn, or you can cut strips of your Gritty color yarn, latch-hook them in place, and brush them out with a slicker brush/carding comb to make them nice and fluffy. Optional: If you have a slicker brush/carding comb, you can also run it over all of the Gritty-colored yarn to make it slightly fuzzier.
Sew the bottom of Gritty’s head to the Gritty-colored yarn at the top of his torso.
Stuff Gritty’s legs firmly. Stuff the toe pieces, then sew them to the sides of the legs so one edge of the open side of the toe pieces lines up with the back loop crochet at the bottom of Gritty’s legs. See photo.
Stuff Gritty’s torso firmly and fairly full, leaving some room at the bottom few rows. If you have a toy squeaker, put it in with the torso stuffing. Put the pants under the bottom few rows of Gritty’s jersey, then sew them in place with the long tail of yarn from the end of the jersey. There should be one leg on either side, pointing down. Stuff Gritty most of the rest of the way, with only two or three rounds at the cuffs of his pants left unstuffed.
Put Gritty’s legs in his pants, allowing the pants to overlap his legs by two or three rounds. Make sure the toes are pointing forward/are on the same side as the Flyers logo, then sew his legs in place one at a time, making sure the pants still overlap the legs by just a bit.
Make eyes out of felt and paint the pupils on, embroider them, or buy plastic eyes, then either sew or hot glue in place, as you prefer.
If you like this pattern and are comfortably able to do so, please consider donating to the Philly Bail Fund and/or to the Attic Youth Center! They're both fantastic organizations located right in Gritty's hometown.
no subject
Date: 2020-12-22 06:14 pm (UTC)And yes, the Philly Bail Fund and Attic Youth Center are both good and will do good things with your money!