Hello to all :) And a special, slightly belated hello to all the Bronies (and pals?) over from Equestria Daily ♥
Surprise pattern time! I in no way expected this to be the next pattern I posted, and then I ended up crocheting it on a whim, so. It's definitely more on the "difficult" side as my patterns go, I'm afraid :P Still, I'm hoping to have a much simpler pattern up next - or at least relatively soon.
A note on the pattern as a whole: This pattern is based on the basic ponies we see so much of in the show, particularly the mane cast and the background ponies. Ponies with different body types - Celestia, Luna, Big Macintosh, Granny Smith, younger ponies, and anyone I might be forgetting - would ideally have a different shape. Unfortunately, I'm not likely to get around to making the patterns for them any time soon, short of getting a commission for them (or a really huge donation or something); this pattern will still work for any of them, it just won't look -quite- right. [Edit:]![[deviantart.com profile]](https://i.deviantart.net/icons/favicon.png) uminohoshi suggests half-double crochet (double crochet for the UK folks) for young ponies. [/edit]
uminohoshi suggests half-double crochet (double crochet for the UK folks) for young ponies. [/edit]
Another lifehack from the comments: "The trick to stuffing a dark piece with pale fiberfill is to find a darkish sock (or the foot off a pair of pantyhose) and put that inside the piece, then stuff the sock." Way cool.
As always, feel free to alter something with the pattern if, while you are making it, you think it would look better. It's more important that you're happy with the end product than you stick exactly to the pattern.
Moving right along, let's start with pictures:
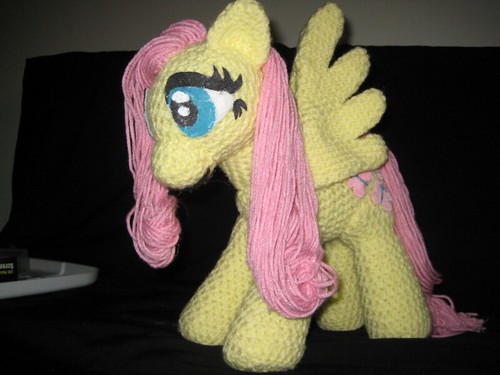

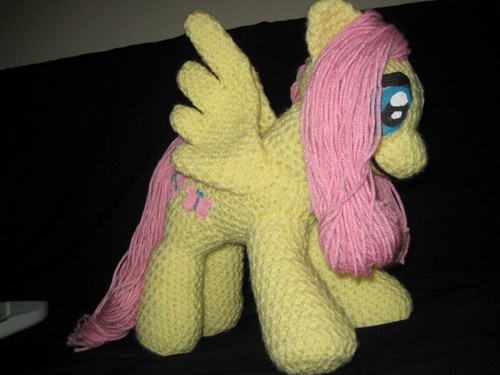

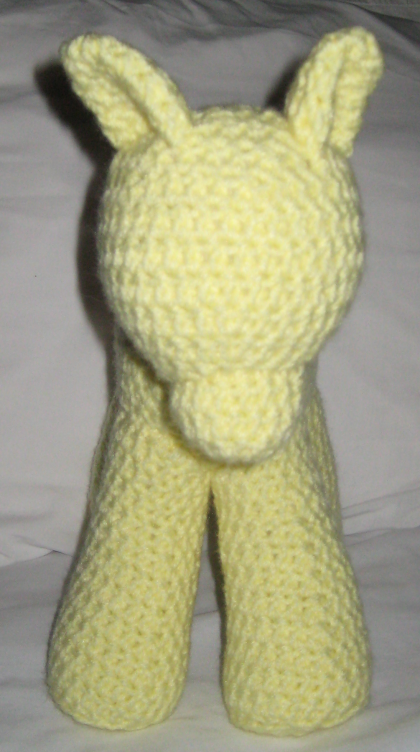
The finished product in the form of Fluttershy ♥ She's not actually my favorite pony, but she is pretty far up on the list ;)
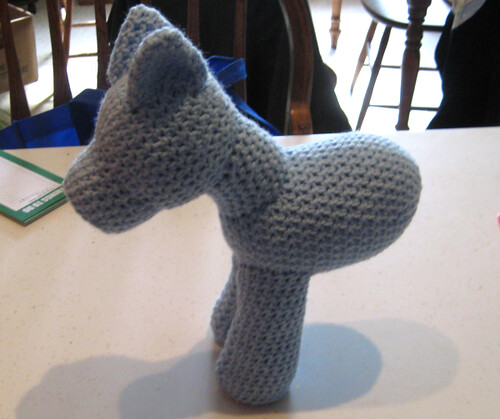
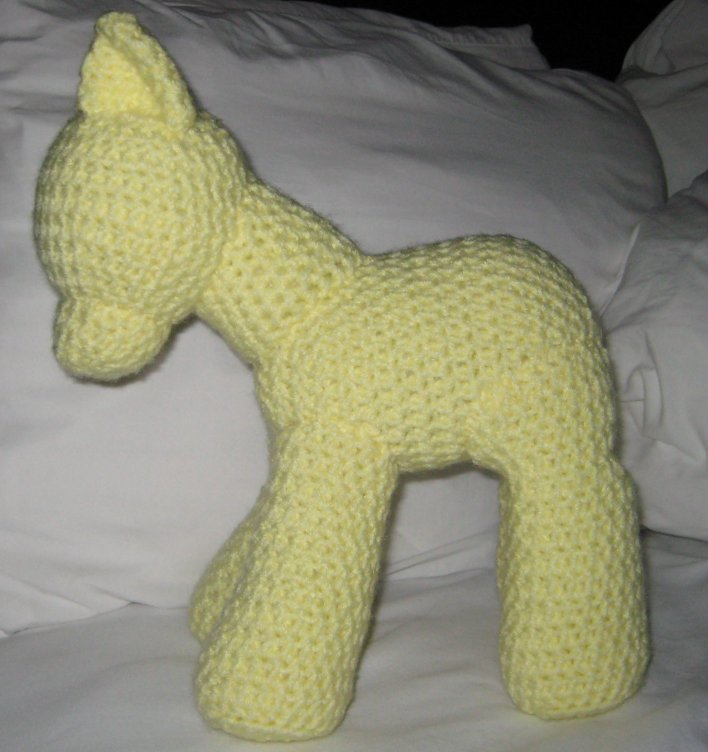
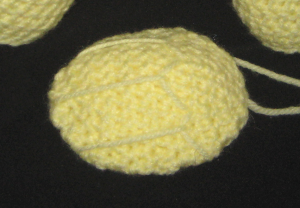
Here's also some pictures of Fluttershy before she got her wings and finishing touches: One, Two, Three
Hopefully that'll help out anyone who's having a problem with attaching things.
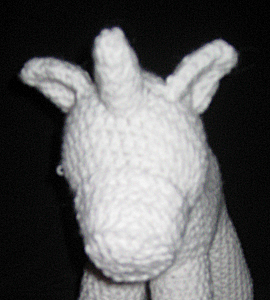
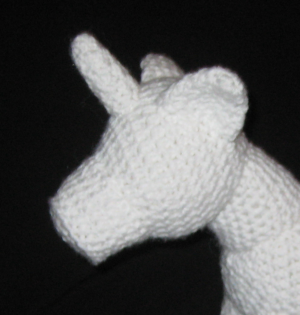
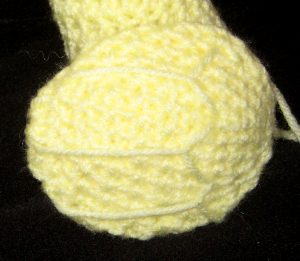
While I'm at it, here's some reference images for alternate crochet options: Boy nose 1 (with unicorn horn), Boy nose 2 (with unicorn horn), Folded wing 1, Folded wing 2
The white pony pictured above is actually going to be Rarity when finished; I gave her a temporary nose job so I could get some reference images in this post. Being the embodiment of generosity, I'm sure she won't mind - especially if I get it off her quick ;)
I was originally planning to make a Dr. Whoof to showcase the alternate nose, but these ponies take a long time to crochet, and I've got a charity project to finish ^^a I used up all of my vacation time on Fluttershy and soon-to-be-Rarity, and now it's time to get down to business. After I'm done with that, though, back to fun :Dbb
Speaking of fun, here's a little pic from one of the FFVII ponies:
Innit a scream? I guess it just goes to show what a little balanced stuffing/patterning can do ;)
Pattern time!
Large print PDFs: [US version] [UK version]
Both are in 18 point Verdana font for ease of readability; neither include pictures. I just used find-and-replace in the UK version, so if there's anything I need to change other than dc = tc and sc = dc, please don't hesitate to let me know!
Jan 6 2013 The marvelous Lenka has translated this pattern into Czech! Go check it out if it's your language - or even if it's not; she's included some great pictures of the process, including the "Rainbow Dash" style wings.
I am also pleased to announce that![[blogspot.com profile]](https://p.dreamwidth.org/b71b2eab44db/-/blogger.com/favicon.ico) knitoneawesome has made a single crochet version (double crochet for the UK folks) and it looks fantastic! Everyone who has ever wanted a SC version is invited to take a look - and even those who like the DC version fine, because who knows if you won't like that one better?
knitoneawesome has made a single crochet version (double crochet for the UK folks) and it looks fantastic! Everyone who has ever wanted a SC version is invited to take a look - and even those who like the DC version fine, because who knows if you won't like that one better?
For this pattern you need to know: How to crochet in the round [spiral], chain stitch (ch), single crochet (sc), double crochet (dc), how to increase ([stitch] 2 in 1), how to decrease ([stitch] 2 tog), front loop crochet (fl [stitch]), back loop crochet (bl [stitch]), US stitch names. You can find a bunch of crochet tutorials here.
A note on wings: I tried like the dickens to come up with a single-piece unfolded wing pattern, but nothing I came up with looked Rainbow Dash enough - and considering that some of you might well be crocheting Rainbow Dash, that was at least 20% too uncool. So I decided to go with a compromise, and offer a pattern both for folded wings and for more "Rainbow Dash" unfolded wings. The folded wings still look fine, and are a bit simpler if you've already gotten a terrible headache from the rest of the pattern. (Or at least from the hindlegs. If the front loop decreasing/back loop increasing in the middle of those is giving you a headache, they should still work fine with regular double crochet decreasing/increasing; they'll just lose a touch of "sharpness", which you'll really want to keep with the hooves if nowhere else.) Make whichever ones you feel most comfortable with - or heck, make one of each! That'd probably be great for Derpy ;)
For those who want a sc pattern instead of a dc pattern: I don't know if I'll ever have the patience needed to work everything out exactly, BUT I do have a conversion rate: For every 3 rows of dc, I crochet 5 rows of sc. Increasing at 6 stitches per round usually ends up with about the same dimensions, so it's mostly the straight-up "dc 1 in 1 all around" rounds you need to convert. To find out how many rounds of sc to use instead of dc, divide the dc number by 3, and then multiply the result by 5. For example, in the body there are 9 rounds with no stitch number changes; 9/3 = 3, 3x5 = 15, so you need to do 15 rounds of sc.
For the parts that increase or decrease at a lower rate than 6 stitches per round (ears, legs), maybe try alternating each row that changes number with a row that doesn't change number? I don't know if it will work, but it may be worth a shot.
Sizing Info: I used a 5mm/H hook for a gauge of ~4.5 dc per inch/5 dc per 3cm, 6 rounds per 2 inches/5cm. I'd estimate 250 yards required; I usually pick up a skein of Red Heart or I Love This and end up with plenty of extra.
Head
Round 1: Begin in a ring; dc 12; continue in a spiral
Round 2: dc 18 (dc 2 in 1, dc 1)
Round 3: dc 24 (dc 2 in 1, dc 2)
Round 4: dc 30 (dc 2 in 1, dc 3)
Round 5: dc 36 (dc 2 in 1, dc 4)
Round 6 thru 8: dc 36 (dc 1 in 1 all around)
Round 9: dc 30 (dc 2 tog, dc 4)
Round 10: dc 24 (dc 2 tog, dc 3)
Round 11: dc 18 (dc 2 tog, dc 2)
Round 12: dc 12 (dc 2 tog, dc 1)
Round 13: dc 6 (dc 2 tog all around)
Round 14: sl st 3 (sl st 2 tog all around)
Finish
Neck
Round 1: ch 23; sl st 1 through first ch; continue in a spiral
Round 2: sc 22
Round 3: sc 6, dc 11, sc 5
Round 4: repeat 2
Round 5: repeat 3
Round 6: repeat 2
Round 7: repeat 3
Finish
When attaching, make sure the longer part of the neck faces the back of the head and body.
Body
Round 1: Begin in a ring; dc 12; continue in a spiral
Round 2: dc 18 (dc 2 in 1, dc 1)
Round 3: dc 24 (dc 2 in 1, dc 2)
Round 4: dc 30 (dc 2 in 1, dc 3)
Round 5: dc 36 (dc 2 in 1, dc 4)
Round 6 thru 14 (nine rounds): dc 36 (dc 1 in 1 all around)
Round 15: dc 30 (dc 2 tog, dc 4)
Round 16: dc 24 (dc 2 tog, dc 3)
Round 17: dc 18 (dc 2 tog, dc 2)
Round 18: dc 12 (dc 2 tog, dc 1)
Round 19: dc 6 (dc 2 tog all around)
Round 20: sl st 3 (sl st 2 tog all around)
Finish
Nose (female)
Round 1: Begin in a ring; sc 6; continue in a spiral
Round 2: dc 12 (dc 2 in 1 all around)
Round 3: dc 18 (dc 2 in 1, dc 1)
Round 4: dc 18 (dc 1 in 1 all around)
Nose (male)
Round 1: Begin in a ring; sc 6; continue in a spiral
Round 2: sc 12 (sc 2 in 1 all around)
Round 3: sc 24 (sc 2 in 1 all around)
Round 4: fl sc 24
Round 5 thru 7: dc 24 (dc 1 in 1 all around)
Finish
Ears (make two)
Round 1: Begin in a ring; sc 6; continue in a spiral
Round 2: dc 9 (dc 2 in 1, dc 1)
Round 3: dc 12 (dc 2 in 1, dc 2)
Round 4: dc 15 (dc 2 in 1, dc 3)
Round 5: dc 18 (dc 2 in 1, dc 4)
Forelegs (make two)
Round 1: Begin in a ring; dc 12; continue in a spiral
Round 2: dc 24 (dc 2 in 1 all around)
Round 3: bl sc 24 (bl sc 1 in 1 all around)
Round 4: dc 24 (dc 1 in 1 all around)
Round 5: dc 23 (dc 2 tog, dc 1 in 1 x 22)
Round 6: dc 22 (dc 2 tog, dc 1 in 1 x 21)
Round 7: dc 21 (dc 2 tog, dc 1 in 1 x 20)
Round 8: dc 20 (dc 2 tog, dc 1 in 1 x 19)
Round 9: dc 19 (dc 2 tog, dc 1 in 1 x 18)
Round 10: dc 18 (dc 2 tog, dc 1 in 1 x 17)
Round 11 through 14: dc 18 (dc 1 in 1 all around)
Finish
Hindlegs (make two)
Round 1: Begin in a ring; dc 12; continue in a spiral
Round 2: dc 24 (dc 2 in 1 all around)
Round 3: bl sc 24 (bl sc 1 in 1 all around)
Round 4 through 6: dc 24 (dc 1 in 1 all around)
Round 7: dc 23 (dc 2 tog, dc 1 in 1 x 22)
Round 8: dc 22 (dc 2 tog, dc 1 in 1 x 21)
Round 9: dc 21 (dc 2 tog, dc 1 in 1 x 20)
Round 10: dc 20 (dc 2 tog, dc 1 in 1 x 19)
Round 11: dc 19 (dc 2 tog, dc 1 in 1 x 18)
Round 12: dc 2 tog, dc 5, bl dc 2 tog x 3, dc 6 (dc 15)
Round 13: dc 6, fl dc 2 in 1 x 3, dc 6 (dc 18)
Round 14: dc 21 (dc 2 in 1, dc 5)
Round 15: dc 24 (dc 2 in 1, dc 6)
Round 16: dc 24 (dc 1 in 1 all around)
Finish
Horn (OPTIONAL)
Round 1: Begin in a ring; sc 6; continue in a spiral
Round 2: bl dc 8 (bl dc 2 in 1, dc 2)
Round 3 through 5: bl dc 8 (bl dc 1 in 1 all around)
Finish
Folded Wings (make two) (OPTIONAL)
Round 1: Begin in a ring; sc 6; continue in a spiral
Round 2: dc 12 (dc 2 in 1 all around)
Round 3: dc 18 (dc 2 in 1, dc 1)
Round 4: dc 24 (dc 2 in 1, dc 2)
Round 5 through 8: dc 24 (dc 1 in 1 all around)
Round 9: dc 18 (dc 2 tog, dc 2)
Round 10: dc 12 (dc 2 tog, dc 1)
Round 11: dc 6 (dc 2 tog all around)
Round 12: sl st 3 (sl st 2 tog all around)
Finish
Sew in feather pattern
Rainbow Dash Wings (OPTIONAL)
Feather 1 (make two)
Round 1: Begin in a ring; sc 6; continue in a spiral
Round 2: dc 9 (dc 2 in 1, dc 1)
Round 3: dc 9 (dc 1 in 1 all around)
Finish
Feather 2 (make two)
Round 1: Begin in a ring; sc 6; continue in a spiral
Round 2: dc 9 (dc 2 in 1, dc 1)
Round 3 and 4: dc 9 (dc 1 in 1 all around)
Finish
Feather 3 (make two)
Round 1: Begin in a ring; sc 6; continue in a spiral
Round 2: dc 9 (dc 2 in 1, dc 1)
Round 3 through 5: dc 9 (dc 1 in 1 all around)
Finish
Feather 4/Main Wing (make two)
Note: For pics of how to put everything together, I highly recommend Lenka's Czech translation of the pattern; she includes a number of very helpful images of the process.
Round 1: Begin in a ring; sc 6; continue in a spiral
Round 2: dc 9 (dc 2 in 1, dc 1)
Round 3 through 7: dc 9 (dc 1 in 1 all around)
Round 8: dc 4; continuing on Feather 3, dc 9; switch back to Main Wing, dc 3, dc 2 tog
Round 9: dc 2 tog, dc 7; continuing on Feather 2, dc 9; switch back to Main Wing, dc 9, dc 2 tog
Round 10: dc 2 tog, dc 11; continuing on Feather 1, dc 9; switch back to Main Wing, dc 9, dc 2 tog
Round 11: dc 2 tog, dc 26, dc 2 tog x 2
Round 12: dc 2 tog x 2, dc 20, dc 2 tog x 2
Round 13: dc 2 tog x 2, dc 15, dc 2 tog x 2
Round 14: dc 2 tog x 2, dc 11, dc 2 tog x 2
Round 15: dc 2 tog x 2, dc 6, dc 2 tog x 2
Round 16: dc 2 tog x 2, dc 3, dc 2 tog
Finish
Assembly:
I usually start with the head and designate the first ring as the "front". I sew the nose on over that spot, with the first rows lining up to the best of my ability. I usually stuff the nose when it's about two-thirds sewn on.
For the ear placement, imagine a line that goes from the front middle of the nose to the middle of the back of the head. The bottom of the ear should roughly match up with this. DO NOT STUFF THE EARS. Make sure they're curved slightly towards the top of the head as you sew them on. The ears should be about an inch and a half/four centimeters apart at their closest point.
I usually sew the neck to the head before the body, but you can do it either way. Make sure the narrowest part lines up with what will be the front of the body/head, and the widest part faces with what will be the back of the body/head. I like to attach the neck a couple rounds "behind" the nose and maybe one above the first round of the body, and then as evenly/round as I can from there. I don't stuff the neck until it's at least half-way sewn down to the second body part.
All four legs I stuff almost to the top. Imagine a line that divides the pony's belly in half lengthwise; you can use a contrasting color of yarn as a visual aid, which I usually do. With the "line" of decreases facing the front, position the front legs on either side of this line directly below the neck. Sew them in place, folding a bit of the cloth in on the inside of each leg to allow the legs to curve slightly around the body. Do the same thing with the rear legs at the back end of the pony.
If you're attaching a horn, sew it an even distance between the ears and about two rounds in front of them.
If you're attaching wings, sew them on to the body slightly below the neck about where the sc turn into dc and vice-versa; make sure the feather ends point to the back.
Fluttershy's cutie mark and eyes I made by painting them onto felt, cutting them out, and then hot-gluing them on. For her mane, I used the fringe method, though I substituted a clipboard (longwise) for the lace loom. For her tail, I simply cut a bunch of yarn that looked to be about twice the length of her tail, tied it in the middle, and secured that as firmly as I dared to her hindquarters. For Rarity, I'll probably be using a variation the Owly method, which I haven't actually tried before. I'll probably be crocheting the bases for her hair in rows, attach one end of each to the appropriate places, and adding the top layer of yarn to both sides either before or after the attachment. We'll see how it goes, I guess; when I get around to it, I hope to update this post with pictures of the finished product :)b
I think that's about it! If you have any questions about this pattern, please feel free to leave a comment, and I will try and get my butt in gear to reply with help ^^b Thank you!
20 Jan 2012: By now I've gotten the question several times, "Can I sell ponies I've made using your pattern?" I thought it would be best if I made a more public answer than just in the comments below.
I am generally cool with it! I only ask a few things:
1) Include information on where you got the pattern (Hooked On Anime)
2) If you are able, financially or otherwise, drop me a little something in the tip jar; we'll call the suggested donation $6 USD? Though I won't turn you down if you want to donate more (or less, even).
3) Please comment here or send me a PM or an e-mail or something to let me know you're doing it! You don't have to include your name or anything, I just want to keep an idea in my head of howmuch competition I have popular this pattern is with people selling it and stuff, I guess.
26 Jan 2013: In response to the question "Can I translate your pattern into another language?"
The answer is: Yes! I am deeply flattered by the fact that two people have already asked to do so. If you love this pattern enough to want to share it with other people who don't speak/read English, I would be delighted to see you do so. Please only do two things:
1) Link back here, so people know where the original came from, and:
2) Send me a link to your non-English version so I can share back. You're serving people in a way that I can't; if someone would get better use out of your translation than my original, it only makes sense that they use it, and I can only tell them where to go if I know where to send them.
In response to any other question: There are three pages worth of comments in response to this post. I or someone else may have already answered your question in one of these comments! Check through them before asking your own question. In the future, if I get any repeat questions ("How do I make [Character]'s mane/tail?" is a very common example), I will tell you to check the other comments. Answering repeat questions has taken up time I would prefer to be using to do other things: typing up new patterns, for example, or crocheting things I hope to sell. Please please please check through the information that's already here before asking something.
10 May, 2014: Suggestions for Pinkie Pie's Mane/Tail: I've listed a few here. I haven't tried any of them, since I haven't made Pinkie Pie yet, but those are some options available to you. Good luck!
Thanks very much!
Thanks also to everyone who has helped me make this pattern better; in case it's not obvious, I don't usually use a beta-tester for fan patterns, and every mistake you help me remove helps not only me, but everyone who uses this pattern in the future. I am incredibly grateful to all of you.
Surprise pattern time! I in no way expected this to be the next pattern I posted, and then I ended up crocheting it on a whim, so. It's definitely more on the "difficult" side as my patterns go, I'm afraid :P Still, I'm hoping to have a much simpler pattern up next - or at least relatively soon.
A note on the pattern as a whole: This pattern is based on the basic ponies we see so much of in the show, particularly the mane cast and the background ponies. Ponies with different body types - Celestia, Luna, Big Macintosh, Granny Smith, younger ponies, and anyone I might be forgetting - would ideally have a different shape. Unfortunately, I'm not likely to get around to making the patterns for them any time soon, short of getting a commission for them (or a really huge donation or something); this pattern will still work for any of them, it just won't look -quite- right. [Edit:]
Another lifehack from the comments: "The trick to stuffing a dark piece with pale fiberfill is to find a darkish sock (or the foot off a pair of pantyhose) and put that inside the piece, then stuff the sock." Way cool.
As always, feel free to alter something with the pattern if, while you are making it, you think it would look better. It's more important that you're happy with the end product than you stick exactly to the pattern.
Moving right along, let's start with pictures:
The finished product in the form of Fluttershy ♥ She's not actually my favorite pony, but she is pretty far up on the list ;)
Here's also some pictures of Fluttershy before she got her wings and finishing touches: One, Two, Three
Hopefully that'll help out anyone who's having a problem with attaching things.
While I'm at it, here's some reference images for alternate crochet options: Boy nose 1 (with unicorn horn), Boy nose 2 (with unicorn horn), Folded wing 1, Folded wing 2
The white pony pictured above is actually going to be Rarity when finished; I gave her a temporary nose job so I could get some reference images in this post. Being the embodiment of generosity, I'm sure she won't mind - especially if I get it off her quick ;)
I was originally planning to make a Dr. Whoof to showcase the alternate nose, but these ponies take a long time to crochet, and I've got a charity project to finish ^^a I used up all of my vacation time on Fluttershy and soon-to-be-Rarity, and now it's time to get down to business. After I'm done with that, though, back to fun :Dbb
Speaking of fun, here's a little pic from one of the FFVII ponies:
Innit a scream? I guess it just goes to show what a little balanced stuffing/patterning can do ;)
Pattern time!
Large print PDFs: [US version] [UK version]
Both are in 18 point Verdana font for ease of readability; neither include pictures. I just used find-and-replace in the UK version, so if there's anything I need to change other than dc = tc and sc = dc, please don't hesitate to let me know!
Jan 6 2013 The marvelous Lenka has translated this pattern into Czech! Go check it out if it's your language - or even if it's not; she's included some great pictures of the process, including the "Rainbow Dash" style wings.
I am also pleased to announce that
For this pattern you need to know: How to crochet in the round [spiral], chain stitch (ch), single crochet (sc), double crochet (dc), how to increase ([stitch] 2 in 1), how to decrease ([stitch] 2 tog), front loop crochet (fl [stitch]), back loop crochet (bl [stitch]), US stitch names. You can find a bunch of crochet tutorials here.
A note on wings: I tried like the dickens to come up with a single-piece unfolded wing pattern, but nothing I came up with looked Rainbow Dash enough - and considering that some of you might well be crocheting Rainbow Dash, that was at least 20% too uncool. So I decided to go with a compromise, and offer a pattern both for folded wings and for more "Rainbow Dash" unfolded wings. The folded wings still look fine, and are a bit simpler if you've already gotten a terrible headache from the rest of the pattern. (Or at least from the hindlegs. If the front loop decreasing/back loop increasing in the middle of those is giving you a headache, they should still work fine with regular double crochet decreasing/increasing; they'll just lose a touch of "sharpness", which you'll really want to keep with the hooves if nowhere else.) Make whichever ones you feel most comfortable with - or heck, make one of each! That'd probably be great for Derpy ;)
For those who want a sc pattern instead of a dc pattern: I don't know if I'll ever have the patience needed to work everything out exactly, BUT I do have a conversion rate: For every 3 rows of dc, I crochet 5 rows of sc. Increasing at 6 stitches per round usually ends up with about the same dimensions, so it's mostly the straight-up "dc 1 in 1 all around" rounds you need to convert. To find out how many rounds of sc to use instead of dc, divide the dc number by 3, and then multiply the result by 5. For example, in the body there are 9 rounds with no stitch number changes; 9/3 = 3, 3x5 = 15, so you need to do 15 rounds of sc.
For the parts that increase or decrease at a lower rate than 6 stitches per round (ears, legs), maybe try alternating each row that changes number with a row that doesn't change number? I don't know if it will work, but it may be worth a shot.
Sizing Info: I used a 5mm/H hook for a gauge of ~4.5 dc per inch/5 dc per 3cm, 6 rounds per 2 inches/5cm. I'd estimate 250 yards required; I usually pick up a skein of Red Heart or I Love This and end up with plenty of extra.
Head
Round 1: Begin in a ring; dc 12; continue in a spiral
Round 2: dc 18 (dc 2 in 1, dc 1)
Round 3: dc 24 (dc 2 in 1, dc 2)
Round 4: dc 30 (dc 2 in 1, dc 3)
Round 5: dc 36 (dc 2 in 1, dc 4)
Round 6 thru 8: dc 36 (dc 1 in 1 all around)
Round 9: dc 30 (dc 2 tog, dc 4)
Round 10: dc 24 (dc 2 tog, dc 3)
Round 11: dc 18 (dc 2 tog, dc 2)
Round 12: dc 12 (dc 2 tog, dc 1)
Round 13: dc 6 (dc 2 tog all around)
Round 14: sl st 3 (sl st 2 tog all around)
Finish
Neck
Round 1: ch 23; sl st 1 through first ch; continue in a spiral
Round 2: sc 22
Round 3: sc 6, dc 11, sc 5
Round 4: repeat 2
Round 5: repeat 3
Round 6: repeat 2
Round 7: repeat 3
Finish
When attaching, make sure the longer part of the neck faces the back of the head and body.
Body
Round 1: Begin in a ring; dc 12; continue in a spiral
Round 2: dc 18 (dc 2 in 1, dc 1)
Round 3: dc 24 (dc 2 in 1, dc 2)
Round 4: dc 30 (dc 2 in 1, dc 3)
Round 5: dc 36 (dc 2 in 1, dc 4)
Round 6 thru 14 (nine rounds): dc 36 (dc 1 in 1 all around)
Round 15: dc 30 (dc 2 tog, dc 4)
Round 16: dc 24 (dc 2 tog, dc 3)
Round 17: dc 18 (dc 2 tog, dc 2)
Round 18: dc 12 (dc 2 tog, dc 1)
Round 19: dc 6 (dc 2 tog all around)
Round 20: sl st 3 (sl st 2 tog all around)
Finish
Nose (female)
Round 1: Begin in a ring; sc 6; continue in a spiral
Round 2: dc 12 (dc 2 in 1 all around)
Round 3: dc 18 (dc 2 in 1, dc 1)
Round 4: dc 18 (dc 1 in 1 all around)
Nose (male)
Round 1: Begin in a ring; sc 6; continue in a spiral
Round 2: sc 12 (sc 2 in 1 all around)
Round 3: sc 24 (sc 2 in 1 all around)
Round 4: fl sc 24
Round 5 thru 7: dc 24 (dc 1 in 1 all around)
Finish
Ears (make two)
Round 1: Begin in a ring; sc 6; continue in a spiral
Round 2: dc 9 (dc 2 in 1, dc 1)
Round 3: dc 12 (dc 2 in 1, dc 2)
Round 4: dc 15 (dc 2 in 1, dc 3)
Round 5: dc 18 (dc 2 in 1, dc 4)
Forelegs (make two)
Round 1: Begin in a ring; dc 12; continue in a spiral
Round 2: dc 24 (dc 2 in 1 all around)
Round 3: bl sc 24 (bl sc 1 in 1 all around)
Round 4: dc 24 (dc 1 in 1 all around)
Round 5: dc 23 (dc 2 tog, dc 1 in 1 x 22)
Round 6: dc 22 (dc 2 tog, dc 1 in 1 x 21)
Round 7: dc 21 (dc 2 tog, dc 1 in 1 x 20)
Round 8: dc 20 (dc 2 tog, dc 1 in 1 x 19)
Round 9: dc 19 (dc 2 tog, dc 1 in 1 x 18)
Round 10: dc 18 (dc 2 tog, dc 1 in 1 x 17)
Round 11 through 14: dc 18 (dc 1 in 1 all around)
Finish
Hindlegs (make two)
Round 1: Begin in a ring; dc 12; continue in a spiral
Round 2: dc 24 (dc 2 in 1 all around)
Round 3: bl sc 24 (bl sc 1 in 1 all around)
Round 4 through 6: dc 24 (dc 1 in 1 all around)
Round 7: dc 23 (dc 2 tog, dc 1 in 1 x 22)
Round 8: dc 22 (dc 2 tog, dc 1 in 1 x 21)
Round 9: dc 21 (dc 2 tog, dc 1 in 1 x 20)
Round 10: dc 20 (dc 2 tog, dc 1 in 1 x 19)
Round 11: dc 19 (dc 2 tog, dc 1 in 1 x 18)
Round 12: dc 2 tog, dc 5, bl dc 2 tog x 3, dc 6 (dc 15)
Round 13: dc 6, fl dc 2 in 1 x 3, dc 6 (dc 18)
Round 14: dc 21 (dc 2 in 1, dc 5)
Round 15: dc 24 (dc 2 in 1, dc 6)
Round 16: dc 24 (dc 1 in 1 all around)
Finish
Horn (OPTIONAL)
Round 1: Begin in a ring; sc 6; continue in a spiral
Round 2: bl dc 8 (bl dc 2 in 1, dc 2)
Round 3 through 5: bl dc 8 (bl dc 1 in 1 all around)
Finish
Folded Wings (make two) (OPTIONAL)
Round 1: Begin in a ring; sc 6; continue in a spiral
Round 2: dc 12 (dc 2 in 1 all around)
Round 3: dc 18 (dc 2 in 1, dc 1)
Round 4: dc 24 (dc 2 in 1, dc 2)
Round 5 through 8: dc 24 (dc 1 in 1 all around)
Round 9: dc 18 (dc 2 tog, dc 2)
Round 10: dc 12 (dc 2 tog, dc 1)
Round 11: dc 6 (dc 2 tog all around)
Round 12: sl st 3 (sl st 2 tog all around)
Finish
Sew in feather pattern
Rainbow Dash Wings (OPTIONAL)
Feather 1 (make two)
Round 1: Begin in a ring; sc 6; continue in a spiral
Round 2: dc 9 (dc 2 in 1, dc 1)
Round 3: dc 9 (dc 1 in 1 all around)
Finish
Feather 2 (make two)
Round 1: Begin in a ring; sc 6; continue in a spiral
Round 2: dc 9 (dc 2 in 1, dc 1)
Round 3 and 4: dc 9 (dc 1 in 1 all around)
Finish
Feather 3 (make two)
Round 1: Begin in a ring; sc 6; continue in a spiral
Round 2: dc 9 (dc 2 in 1, dc 1)
Round 3 through 5: dc 9 (dc 1 in 1 all around)
Finish
Feather 4/Main Wing (make two)
Note: For pics of how to put everything together, I highly recommend Lenka's Czech translation of the pattern; she includes a number of very helpful images of the process.
Round 1: Begin in a ring; sc 6; continue in a spiral
Round 2: dc 9 (dc 2 in 1, dc 1)
Round 3 through 7: dc 9 (dc 1 in 1 all around)
Round 8: dc 4; continuing on Feather 3, dc 9; switch back to Main Wing, dc 3, dc 2 tog
Round 9: dc 2 tog, dc 7; continuing on Feather 2, dc 9; switch back to Main Wing, dc 9, dc 2 tog
Round 10: dc 2 tog, dc 11; continuing on Feather 1, dc 9; switch back to Main Wing, dc 9, dc 2 tog
Round 11: dc 2 tog, dc 26, dc 2 tog x 2
Round 12: dc 2 tog x 2, dc 20, dc 2 tog x 2
Round 13: dc 2 tog x 2, dc 15, dc 2 tog x 2
Round 14: dc 2 tog x 2, dc 11, dc 2 tog x 2
Round 15: dc 2 tog x 2, dc 6, dc 2 tog x 2
Round 16: dc 2 tog x 2, dc 3, dc 2 tog
Finish
Assembly:
I usually start with the head and designate the first ring as the "front". I sew the nose on over that spot, with the first rows lining up to the best of my ability. I usually stuff the nose when it's about two-thirds sewn on.
For the ear placement, imagine a line that goes from the front middle of the nose to the middle of the back of the head. The bottom of the ear should roughly match up with this. DO NOT STUFF THE EARS. Make sure they're curved slightly towards the top of the head as you sew them on. The ears should be about an inch and a half/four centimeters apart at their closest point.
I usually sew the neck to the head before the body, but you can do it either way. Make sure the narrowest part lines up with what will be the front of the body/head, and the widest part faces with what will be the back of the body/head. I like to attach the neck a couple rounds "behind" the nose and maybe one above the first round of the body, and then as evenly/round as I can from there. I don't stuff the neck until it's at least half-way sewn down to the second body part.
All four legs I stuff almost to the top. Imagine a line that divides the pony's belly in half lengthwise; you can use a contrasting color of yarn as a visual aid, which I usually do. With the "line" of decreases facing the front, position the front legs on either side of this line directly below the neck. Sew them in place, folding a bit of the cloth in on the inside of each leg to allow the legs to curve slightly around the body. Do the same thing with the rear legs at the back end of the pony.
If you're attaching a horn, sew it an even distance between the ears and about two rounds in front of them.
If you're attaching wings, sew them on to the body slightly below the neck about where the sc turn into dc and vice-versa; make sure the feather ends point to the back.
Fluttershy's cutie mark and eyes I made by painting them onto felt, cutting them out, and then hot-gluing them on. For her mane, I used the fringe method, though I substituted a clipboard (longwise) for the lace loom. For her tail, I simply cut a bunch of yarn that looked to be about twice the length of her tail, tied it in the middle, and secured that as firmly as I dared to her hindquarters. For Rarity, I'll probably be using a variation the Owly method, which I haven't actually tried before. I'll probably be crocheting the bases for her hair in rows, attach one end of each to the appropriate places, and adding the top layer of yarn to both sides either before or after the attachment. We'll see how it goes, I guess; when I get around to it, I hope to update this post with pictures of the finished product :)b
I think that's about it! If you have any questions about this pattern, please feel free to leave a comment, and I will try and get my butt in gear to reply with help ^^b Thank you!
20 Jan 2012: By now I've gotten the question several times, "Can I sell ponies I've made using your pattern?" I thought it would be best if I made a more public answer than just in the comments below.
I am generally cool with it! I only ask a few things:
1) Include information on where you got the pattern (Hooked On Anime)
2) If you are able, financially or otherwise, drop me a little something in the tip jar; we'll call the suggested donation $6 USD? Though I won't turn you down if you want to donate more (or less, even).
3) Please comment here or send me a PM or an e-mail or something to let me know you're doing it! You don't have to include your name or anything, I just want to keep an idea in my head of how
26 Jan 2013: In response to the question "Can I translate your pattern into another language?"
The answer is: Yes! I am deeply flattered by the fact that two people have already asked to do so. If you love this pattern enough to want to share it with other people who don't speak/read English, I would be delighted to see you do so. Please only do two things:
1) Link back here, so people know where the original came from, and:
2) Send me a link to your non-English version so I can share back. You're serving people in a way that I can't; if someone would get better use out of your translation than my original, it only makes sense that they use it, and I can only tell them where to go if I know where to send them.
In response to any other question: There are three pages worth of comments in response to this post. I or someone else may have already answered your question in one of these comments! Check through them before asking your own question. In the future, if I get any repeat questions ("How do I make [Character]'s mane/tail?" is a very common example), I will tell you to check the other comments. Answering repeat questions has taken up time I would prefer to be using to do other things: typing up new patterns, for example, or crocheting things I hope to sell. Please please please check through the information that's already here before asking something.
10 May, 2014: Suggestions for Pinkie Pie's Mane/Tail: I've listed a few here. I haven't tried any of them, since I haven't made Pinkie Pie yet, but those are some options available to you. Good luck!
Thanks very much!
Thanks also to everyone who has helped me make this pattern better; in case it's not obvious, I don't usually use a beta-tester for fan patterns, and every mistake you help me remove helps not only me, but everyone who uses this pattern in the future. I am incredibly grateful to all of you.